How to check your oil

How to check your oil

Engine oil is one of the most important elements of your vehicle, since it helps to keep the various engine components functioning properly and stops them from wearing out too quickly.

It’s important, therefore, to conduct regular oil checks to ensure you have the right amount of oil in the engine. If your oil level drops too low, you’ll face a higher risk of parts seizing up and the engine potentially sustaining serious damage.

Here are the steps you need to follow to conduct a safe and accurate check of your engine oil:

Get the car ready

One of the most important things to do before checking your oil is to make sure the car is parked on a level surface. This helps to ensure that, when you check the oil level, you get an accurate measurement.

You should also make sure the engine is cool before opening the bonnet and touching the components inside. It’s advisable to wait at least ten minutes after switching the engine off before conducting any checks.

As well as letting the engine bay cool down, this time allows the oil to settle in the oil sump.

Check the oil level

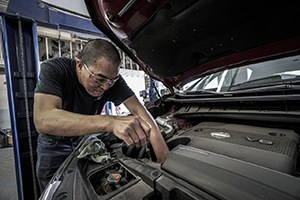
Once your car is parked on a level surface and the engine has cooled down, you can carry out the oil check.

The first thing to do, after opening the bonnet, is to find the dipstick, which is usually identifiable by a brightly coloured hook or loop at the end. If you can’t find the dipstick, it’s possible that your car has an electronic oil monitor and the level is displayed on the dashboard.

Once you’ve found the dipstick, remove it carefully, wipe off any oil and put it all the way back into the tube. Let it sit for a moment before removing it again to check the current oil level in the engine.

There should be two lines on the dipstick indicating the minimum and maximum oil levels, so the oil mark should ideally be halfway between these lines. If it’s below halfway, it’s probably a good idea to add some more oil, and if it’s below the minimum line, you need to top up as soon as possible.

Top up if necessary

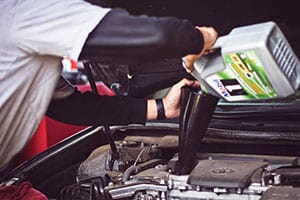
If you need to add some more oil to your engine, firstly you need to know what oil to use, which you can find out by checking your car’s handbook or contacting the manufacturer. Using the wrong oil can cause damage to the engine.

Find the oil cap (usually marked with a picture of an oil can), remove it and pour in extra oil a little at a time. It’s important to stop regularly to repeat the oil level check with the dipstick, since adding too much oil can also harm the engine.

Once you have your oil at the right level, you can continue using your car with confidence that the engine is properly lubricated.

MyService.Expert from Fuelcard Services can help you ensure your vehicle is always safe and reliable with regular servicing, MOTs and maintenance at more than 4,500 garages nationwide.

How to prepare you r car for long journeys

How to prepare your car for long journeys

When you’re preparing to set off on a long drive, you want to know that your car is in the best possible condition to reach your destination safely.

That’s why it’s important to do the right things to get your vehicle ready before setting off.

Here are some of the most useful steps you can take to ensure your car is prepared for a lengthy journey:

Check fluid levels

Checking the levels of the various fluids your car needs to run properly is one of the most important things you can do to keep the vehicle running properly. Before embarking on a long trip, make sure you check your engine oil, water, brake fluid and antifreeze are all at the right levels.

It’s also a good idea to stock your car with the right fluids in case anything needs to be topped up during your journey.

Prepare your tyres

Make sure your tyres are pumped to the correct pressure and the tread depth meets the relevant legal requirements (1.6mm in the UK). This will help to ensure your tyres are ready for the journey and you can drive safely the whole way.

It’s also important to pack everything you will need to change a tyre, including a spare that’s inflated to the right pressure. To change a tyre, you’ll need a jack, a wrench to remove the wheel nuts, a wheel chock to stop the car from rolling when it’s jacked up, and a wheel nut key if locking nuts are fitted.

Test the brakes

It goes without saying that your brakes need to be in good condition to drive safely at all times, but it’s particularly important to check them before a long journey.

Look out for warning signs that your brake pads are wearing thin and need replacing, like the brakes feeling soft when applied. A grinding sound could mean the brake pads are worn out and will definitely need to be replaced before a long trip.

Check your lights

Set aside some time before starting your journey to check that all of the lights on your car – including easily overlooked ones like fog lights and reversing lights – are in good working order.

It’s a good idea to pack some spare bulbs in the car, just in case any need to be replaced during your journey.

Pack emergency kit

Preparing in advance will reduce the risk of any problems cropping up on a long drive, but it’s always wise to have certain items in your car to deal with breakdowns or emergency situations.

Jump leads, a first-aid kit, a torch, a high-visibility vest and a warning triangle can all prove useful if you have problems on the road. If you’re driving abroad, check local laws to see if there is anything specific you’re expected to have in your car.

MyService.Expert from Fuelcard Services can help you ensure your car is ready for every journey with regular servicing, maintenance, repairs and MOTs available from thousands of garages nationwide.

Road safety advice for driving in bad weather

Road safety advice for driving in bad weather

Bad weather comes with the territory when winter takes hold, with wind, rain, snow and fewer hours of sunlight all making driving that much more hazardous.

As a result, every motorist should know what to do to stay as safe as possible when the conditions take a turn for the worse. So, to make sure that’s the case, we’ve put together a list of simple tips that will help drivers avoid the dangers of travelling in poor weather.


Plan journeys in advance

Preparation is everything when it comes to taking the stress and difficulty out of journeys during the colder, harsher months of the year. As a result, it’s important to plan your journeys in advance before setting out.

This means mapping out your journey, including setting aside time for rest stops and paying heed to weather reports that should enable you to avoid the worst conditions. You should also factor in the time of day that you will be travelling and aim to avoid routes that are likely to have a higher volume of traffic.


Reduce your speed

The risk of snow, wind, sleet and rain is significantly higher during the winter months, so you must be prepared to tackle these conditions every time you get behind the wheel. Key to safer driving when faced with adverse weather is the understanding that you need to slow down.

Rain on the road can double the stopping distance of vehicles, while snow or ice can see distances become up to ten times further. As a result, you should take this into account when driving and reduce your speed when bad weather hits. You should also be sure to increase your following distance accordingly to other vehicles.


Be on the lookout for hazards

Vigilance is key when it comes to staying safe during adverse conditions, so make sure you are well rested and your vision is unimpaired whenever taking to the roads in poor weather – ensure your windows and mirrors are clear at all times and that your headlights are working correctly if travelling after dark.

Hazards like black ice, wet/frosty roads, sudden downpours, fallen branches, wet leaves and more congestion are all factors to take into account in order to stay safe. When driving, always try to look ahead to the conditions further up the road, as this will ensure you’re less likely to need to brake sharply, which can be dangerous when stopping distances are longer.


Pack a winter emergency kit

No-one wants to be left high and dry should they face adverse conditions that lead to a breakdown, so it pays to be prepared and have a winter emergency kit in your vehicle at all times.

Essentials to pack include a portable phone charger/spare battery to be able to call for help in an emergency, an ice scraper for windows and mirrors, a shovel to help dig you out of trouble, blankets and extra warm clothes, a hazard warning triangle, a flashlight and extra snacks and water.


Keep your vehicle well-maintained

Finally, it’s important to ensure you carry out regular inspections of your vehicle to avoid potential issues like breakdowns. This means going over the basics at the start of every journey, from inspecting tyres for excessive wear and tear or damage, to checking the battery is holding its charge even when the temperature plummets.

Other important checks should include ensuring your windows and mirrors are free from snow and ice to provide maximum visibility, as well as ensuring your wipers are in good working order and free from damage to be able to clear your windscreen when the inevitable rain arrives.

MyService.Expert offers a nationwide network of garages where our customers can carry out essential repairs and maintenance for their vehicles. We also offer discounts on all parts and labour, with savings of up to 30 per cent.

Top tips for tyres in winter

Top tips for tyres in winter

Taking care of your tyres is important throughout the year, but during winter there can be a number of factors that make doing so all the more imperative.

With freezing temperatures, snow, ice and rain to contend with, understanding how to keep your tyres in the best possible condition and make use of the right sort of tyres to match the conditions you face is essential.

Check your tyres before each trip

A few simple checks can make all the difference to ensuring your vehicle is ready to face the rigours of winter, with an up-close examination of your tyres key to staying safe on the roads.

The first thing you should always check is that your tyres have sufficient tread depth to be able to displace any standing water.

Tread depth should always exceed the legal minimum of 1.6 mm and this can be checked easily by inserting a 20p coin into the tread and looking to see that the outer band of the coin is obscured. If you can still see the outer band of the coin after it is inserted, this means your tread depth has fallen below the legal minimum and they must be replaced.

The next thing to consider is the pressure of the tyres. You should consult your vehicle’s manual to find out the recommended psi of each tyre, and remember that this can be different for front and rear tyres.

Finally, another up-close examination is essential, this time looking out for any areas of excessive wear and tear around the entire circumference of the tyre. You should be searching for any rips in the tread or sidewall of the tyre, as well as possible bulges that may indicate a serious issue with the internals.

Safety is of utmost importance

Ultimately, your vehicle’s tyres are the only part of the car that physically comes into contact with the road. As a result, you’re solely relying on them to give you the grip, handling and braking that is so imperative when the weather takes a turn for the worse.

Each year, accident rates increase by around 20 per cent during the winter months in comparison to the rest of the year, so taking the time to check your tyres are in the best condition possible can help all road users to stay as safe.

Another change to consider at this time of year is the use of winter tyres. They are specially designed to provide optimal traction in colder temperatures of less than seven degrees Celsius. However, because of the softer compounds used in their construction, winter tyres can be more fragile and will wear more quickly than traditional, all-season tyres.

MyService.Expert offers regular reminders to our customers regarding the essential maintenance that keeps their vehicles in top condition. We also provide savings of up to 30 per cent on all parts and labour for customers, with thousands of garages across our national network where work can be carried out.

how to check and install wiper blades

How to check and install wiper blades

Winter is here and that means darker evenings, colder temperatures and plenty of wind and rain. As a result, windscreen wipers can take a battering at this time of year.

You should never underestimate the importance of being able to keep your field of vision clear and unobscured when driving, so taking the time to understand how to maintain and change your wiper blades when needed is something every motorist should do.

Why are the wipers such crucial equipment?

Being able to see clearly at all times is obviously essential for safety when travelling on the open road and windscreen wipers serve to remove debris and clear water that might otherwise inhibit the driver’s vision.

Common issues that might highlight a vehicle is in need of replacement wiper blades include smearing or streaking when clearing the windscreen that may indicate rips or tears in the material, as well as squeaking or skipping as the blades move back and forth.

It’s also important to remember that as wiper blades are made from rubber, freezing temperatures can cause the rubber to harden and this too can have an adverse impact on their ability to function correctly.

You should carry out a simple inspection on your vehicle’s wipers (both front and back) before embarking on any journey. It takes just a few seconds to lift the blades and examine them for signs of excessive wear and tear, but you might be surprised at just how often this simple step is overlooked.

How to change your vehicle’s wipers with ease

In the most part, changing a set of wiper blades is an easy undertaking. Indeed, it’s something that every driver should be able to carry out.

The first thing to do is to lift the arm of the wiper into its vertical position, then turn the blade perpendicular to the arm and locate the release tab.

Next, turn the blade parallel to the arm and apply gentle pressure to release the wiper blade. Repeat this process in reverse to attach the new blade.

This is the process for the vast majority of vehicles. However, if your car has a unique setup for its wiper blades, refer to your vehicle’s manual or visit the website of the manufacturer for more information.

We understand that vehicle maintenance can be costly and time-consuming, but at MyService.Expert we offer a solution to help keep your cars in tip-top condition with a minimum of fuss and expense.

Our service offers up to a 30 per cent discount on parts and labour for all our customers. We also offer regular maintenance reminders for vehicles you have covered, while you can make use of the facilities at thousands of garages across our national network.